[JAVA] Robot 클래스를 이용한 Screen Capture 코드
출처 : http://park1020.tistory.com/entry/JAVA-Robot-%ED%81%B4%EB%9E%98%EC%8A%A4%EB%A5%BC-%EC%9D%B4%EC%9A%A9%ED%95%9C-Screen-Capture-%EC%BD%94%EB%93%9C
간만에 자바 포스팅.. ㅋ
졸업작품 관련해서 스크린 캡쳐하는 모듈을 간단하게 구현하여 보았다.
자바를 이용해서 스크린 캡쳐라든지, 마우스, 키보드 제어 같은 저수준의 동작들을
네트워크를 통해서 제어할 수 있느냐가
이번 졸작의 핵심사항인데.. 과연 성공할 수 있을지 흥미진진.
우선 스크린 캡쳐 코드.
package capture;
import javax.swing.*;
import java.awt.*;
import java.awt.event.*;
import java.awt.image.*;
import java.io.*;
import com.sun.image.codec.jpeg.*;
public class Main extends JPanel implements Runnable, ActionListener {
JButton btn_capture;
Image img = null;
// 생성자. UI 배치.
public Main() {
this.btn_capture = new JButton("영상캡쳐");
this.btn_capture.addActionListener(this);
this.setLayout(new BorderLayout());
this.add(this.btn_capture, BorderLayout.SOUTH);
}
public void actionPerformed(ActionEvent e) {
String cmd = e.getActionCommand();
if (cmd.equals("영상캡쳐")) {
System.out.println("영상을 캡쳐합니다..");
this.capture(); // 영상캡처 버튼이 눌리면 캡쳐.
}
}
private void drawImage(Image img, int x, int y) {
Graphics g = this.getGraphics();
g.drawImage(img, 0, 0, x, y, this);
this.paint(g);
this.repaint();
}
public void paint(Graphics g) {
if (this.img != null) {
g.drawImage(this.img, 0, 0, this.img.getWidth(this), this.img.getHeight(this), this);
}
}
public void capture() {
Robot robot;
BufferedImage bufImage = null;
try {
robot = new Robot();
Rectangle area = new Rectangle(Toolkit.getDefaultToolkit().getScreenSize());
bufImage = robot.createScreenCapture(area); // Robot 클래스를 이용하여 스크린 캡쳐.
//Graphics2D g2d = bufImage.createGraphics();
int w = this.getWidth();
int h = this.getHeight();
this.img = bufImage.getScaledInstance(w, h - 20, Image.SCALE_DEFAULT);
//this.repaint();
this.drawImage(img, w, h);
saveJPEGfile("cap.jpg", bufImage); // JPG 파일로 변환하여 저장.
} catch (Exception e) {
e.printStackTrace();
}
}
public static boolean saveJPEGfile(String filename, BufferedImage bi) {
FileOutputStream out = null;
try {
out = new FileOutputStream(filename);
JPEGImageEncoder encoder = JPEGCodec.createJPEGEncoder(out);
JPEGEncodeParam param = encoder.getDefaultJPEGEncodeParam(bi);
param.setQuality(1.0f, false);
encoder.setJPEGEncodeParam(param);
encoder.encode(bi);
out.close();
} catch (Exception ex) {
System.out.println("Error saving JPEG : " + ex.getMessage());
return false;
}
return true;
}
public void run() {
while (true) {
this.setBackground(Color.RED);
try {
Thread.sleep(1000);
} catch (Exception e) {
}
this.setBackground(Color.GREEN);
try {
Thread.sleep(1000);
} catch (Exception e) {
}
}
}
public static void createFrame() {
JFrame frame = new JFrame("Jv");
JFrame.setDefaultLookAndFeelDecorated(true);
Container cont = frame.getContentPane();
cont.setLayout(new BorderLayout());
Main mm = new Main();
//new Thread(mm).start();
cont.add(mm, BorderLayout.CENTER);
frame.setSize(400, 400);
frame.setVisible(true);
}
public static void main(String... v) {
//new Main();
JFrame.setDefaultLookAndFeelDecorated(true);
createFrame();
}
}
이 코드의 핵심은 바로 이곳.
robot = new Robot();
Rectangle area = new Rectangle(Toolkit.getDefaultToolkit().getScreenSize());
bufImage = robot.createScreenCapture(area); // Robot 클래스를 이용하여 스크린 캡쳐.
Rectangle area = new Rectangle(Toolkit.getDefaultToolkit().getScreenSize());
bufImage = robot.createScreenCapture(area); // Robot 클래스를 이용하여 스크린 캡쳐.
Robot 클래스를 생성하고, 현재 화면의 사이즈를 Rectangle 클래스로 받아 createScreenCapture 메소드의 인자로 넘기면 BufferedImage 인스턴스를 리턴하여 이미지를 얻을수 있다.
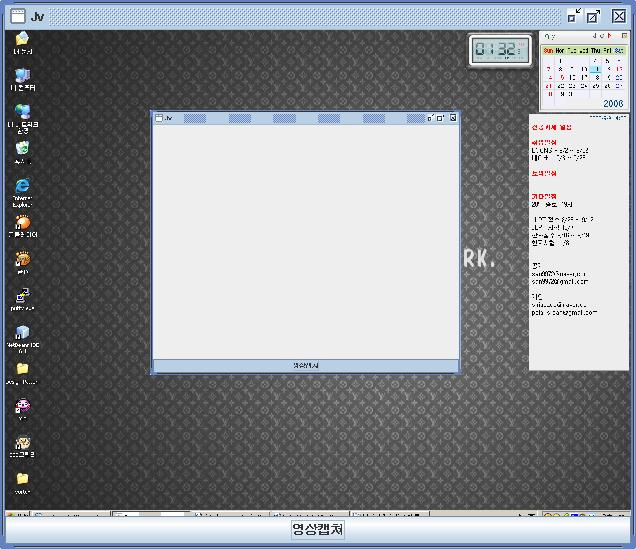
다음은 실행화면.
바탕화면을 캡쳐한것이 Panel의 Center에 위치하게 된다.
또한 이 이미지는 JPG 파일로 변환되어 저장되게 된다.(saveJPEGfile 메소드)
참고로 Robot 클래스는 1.3 부터 기본으로 자바에 포함되어 배포되고 있으며 JavaDoc에 설명이 자세하게 되어 있다. 궁금하면 찾아보도록 ㅎㅎ
여기는 Robot 클래스를 잘 설명해놓은 사이트.
다음은 실행화면.
바탕화면을 캡쳐한것이 Panel의 Center에 위치하게 된다.
또한 이 이미지는 JPG 파일로 변환되어 저장되게 된다.(saveJPEGfile 메소드)
참고로 Robot 클래스는 1.3 부터 기본으로 자바에 포함되어 배포되고 있으며 JavaDoc에 설명이 자세하게 되어 있다. 궁금하면 찾아보도록 ㅎㅎ
여기는 Robot 클래스를 잘 설명해놓은 사이트.
출처 : http://semtle.tistory.com 셈틀쟁님이의 블로그
java : 자바, 자바산 커피, 커피, 자바종
'scrap > Java/JSP' 카테고리의 다른 글
| - [Java 기본]Java 설치, 개념, 주석 (0) | 2011.05.14 |
|---|---|
| - Java 코딩 지침 (0) | 2011.05.14 |
| JAVA설치 후, 환경변수 설정하기 (0) | 2011.03.29 |
| eclipse에서 JDK 소스 보기 (0) | 2011.02.06 |
| Java, asp, php를 활용한 메일보내기 (0) | 2011.02.04 |
